Created :
Written by Support InfoBridge
Overview:
When using the Exchange Synchronizer V2 with an Exchange 2013 backend, you will need to create a MAPI profile to have a working situation.
In Exchange 2013 the 'Microsoft Exchange server' name is no longer the server name. Both Outlook and the Synchronizer will connect directly to the Mailbox of the user.
The first step is to acquire this unique user’s server address for the syncuser. This address consists of the MailBoxGuid of the user and the last part of the User Principal Name (UPN).
How to:
- Go to the Exchange server and open up the Exchange Management Shell
- Enter the following command:
- Get-MailBox syncuser | ft ExchangeGUID
Result:
ExchangeGuid: 60d551b3-48b0-4222-b649-b810dcca9afa
- Then execute the following command:
- Get-MailBox syncuser | fl UserPrincipalName
Result:
UserPrincipalName : syncuser@ibtesting2.local

Your server will be the Guid of the syncuser and the last part of the UPN (the part after the @). In this example, the server name is:
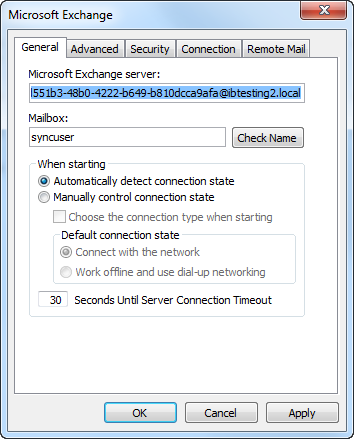
60d551b3-48b0-4222-b649-b810dcca9afa@ibtesting2.local
Enter this value in the Microsoft Exchange server field and enter the username of the syncuser (in this case: syncuser):

Then go to second tab: Advanced.
Make sure Cached Exchange Mode is turned Off. If Cached Mode is enabled, the Sync will not work correctly and will produce unexpected results!

Go to the Connection tab and tick the box Connect to Microsoft Exchange using HTTP.

Next click the button Exchange Proxy Settings...
Enter your internal Exchange Server name, and, depending on your Exchange Configuration, un-tick Connect using SSL only.
Enable On fast networks, connect using HTTP first, then connect using TCP/IP.
Set the Proxy authentication settings to either NTLM Authentication or Negotiate Authentication (also depending on your Exchange Configuration).

Press OK to close the Proxy settings screen, then press OK again to close the Microsoft Exchange Screen.
Finally, press Check Name to verify your settings. The server name and username will be underlined if the configuration succeeded (as can be seen in the example below):
