Created :
Written by Support InfoBridge
Overview
In this manual, we explain how to set up the Exchange Online Synchronizer for synchronizing users divided in different ranks.
Note This article does not apply when you are using OAuth version. It is only applicable for Basic Authentication setups.
This can be used for companies with multiple Exchange environments.
Note When you are dividing users into different ranks because of Throttling issues please note that you should have a different SyncUser in place for each rank. This way you can divide the load into different SyncUsers and minimize throttling. Based on our best practices, we have learned that dividing the users into ranks of 50-100 users per rank is the best option.
How to
Begin by creating new shortcuts for the Exchange Online Synchronizer admin.
The Exchange Online Synchronizer Admin needs to be started with an extra parameter in the start command of the shortcut. The parameter to use are /RANKED and /S<n> (Where <n> stands for the server number, e.g.: /S1)
"C:\Program Files (x86)\InfoBridge\Exchange Online Synchronizer\InfoBridge Synchronizer Administrator.exe" /RANKED /S1
The moment you start the Exchange Online Synchronizer admin a new folder is created in your local user folder. This folder will hold the log files and the service options. A separate folder for each rank is created.
C:\Users\syncuser\AppData\Roaming\InfoBridge SuperOffice Exchange Synchronizer EWS-0001
Technical Settings
Go to the Technical settings after starting the Exchange Online Synchronizer admin. Here you need to add the Exchange server configuration for each rank you use.
When you use one Exchange server you need to add the same information for each rank.
Click on Add to add a new Exchange Server. Specify a server rank for each new added Exchange Server. The rank number corresponds with the /S value in the shortcut.
Click OK when done and save by clicking the Apply this setting for all the users button.

User Synchronization Settings
To be able to link a SuperOffice user to his External mailbox name you have to retrieve the users by clicking on the ‘Load External Users’ button.

In the pop-up screen, you will see all the Exchange servers you added in the Technical Settings. Now you can choose to load all users from all servers. Or you can select one server.
This will populate the External mailbox name list and you will now be able to link the users.
Give each user the correct rank.
NOTE The Technical settings and the linking of the users can be done from 1 server. The next chapter, Service options do need to be done from each Sync Admin separately.
Service options
In the Service Options panel, you have to set the correct Server rank id. This is the same number you use in the /S parameter.
The information from the Service Options is saved in your local user folder, e.g.: C:\Users\syncuser\AppData\Roaming\InfoBridge SuperOffice Exchange Synchronizer EWS-0001
The file is saved as ‘service.ini’
Please check if the correct rank nr is in the service.ini file
NOTE To further configure the Exchange Online Synchronizer admin, see the articles in the Configure section of our Knowledge Base
Services
During the installation of the Exchange Online Synchronizer one service is installed.
To create another Service copy the file ‘Install Extra Service.cmd’ from the Prerequisites folder to the Exchange Online Synchronizer folder and run the command file to create another service.
After the extra service is created, a new parameter needs to be added to the service in the registry.
In the registry go to: HKEY_LOCAL_MACHINE\SYSTEM\CurrentControlSet\Services
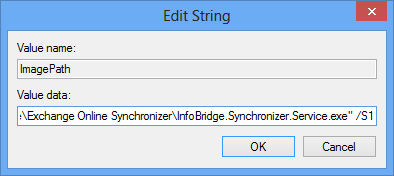
Select the InfoBridge Synchronizer Service and open the ImagePath.
In the Value Data field add the parameter /S<n>

Once the parameter has been added to all the services you are ready to start the Exchange Online Synchronizer on each server.
NOTE There are more options to create the extra Services, more info
NOTE If you want to run the Exchange Online Synchronizer program, you will also need to add the /S<n> parameter to the start command of the shortcut.
You can only run one instance at the time when running the Synchronizer as a program.
When using the services you can run all services at the same time.